Transforming an old wooden bunk bed can breathe new life into a room, offering a fresh aesthetic without the expense of buying new furniture. For many DIY enthusiasts, the thought of sanding conjures images of dust, mess, and endless hours of laborious work. But what if you could achieve a beautiful, durable paint finish without ever picking up a piece of sandpaper? This guide will show you how to skip the sanding and still get professional-looking results, making your bunk bed makeover project much more approachable.
Painting wood furniture without sanding is a game-changer for anyone looking to update a piece quickly and cleanly. It’s about working smarter, not harder, by utilizing modern products designed for superior adhesion. From thorough cleaning to selecting the right primers and paints, every step is crucial to ensuring your newly painted bunk bed stands the test of time and daily use. Let’s dive into the world of no-sand painting and discover how easy it can be to give your bunk bed a stunning new look.
Advantages and Disadvantages of Painting Wood Furniture Without Sanding
Opting to paint your wooden bunk bed without sanding comes with a distinct set of benefits, making it an attractive method for many DIYers. The most immediate advantage is the significant reduction in mess and dust, eliminating the need for extensive cleanup and protecting your living space. This approach also drastically cuts down on project time, allowing for faster transformations. Furthermore, it’s often less physically demanding than traditional sanding, appealing to those who prefer a less strenuous undertaking.
However, this method isn’t without its considerations. While it saves time on one front, it demands meticulous attention to preparation, specifically thorough cleaning and degreasing. Skipping sanding means relying heavily on chemical bonds rather than mechanical ones, necessitating high-quality primers and specialized paints. It might not be the best solution for bunk beds with severe damage like deep scratches or significant structural imperfections, as these issues typically require sanding or filling to resolve properly. Also, achieving a perfectly smooth finish may require more careful application and potentially more coats of paint if the surface isn’t perfectly prepared.
Key Materials and Methods for No-Sanding Painting
Successfully painting an old wood bunk bed without sanding hinges on selecting the right materials and diligently following preparation steps. The foundation of any no-sand project is a pristine surface, making thorough cleaning an absolute must. Heavy-duty degreasers like TSP (trisodium phosphate) are highly effective at removing years of grime, dirt, and grease, ensuring your primer has a clean base to adhere to.
Following cleaning, a liquid sander or deglosser can be applied. These chemical solutions are designed to dull glossy finishes, creating a receptive surface for paint without the need for abrasive sanding. They work by slightly softening the existing finish, allowing new coatings to bond more effectively.
The most critical component in a no-sand painting process is a high-quality bonding primer. These specialized primers are formulated to adhere tenaciously to slick or previously finished surfaces, acting as a bridge between the old finish and your new paint. Oil-based primers, such as Zinsser BIN or Kilz Oil-Based, are frequently recommended for their superior adhesion and ability to block stains and prevent bleed-through, especially on dark woods or pieces with existing finishes that might leach tannins. Shellac-based primers also offer excellent sealing and bonding properties.
When it comes to paint, several types are well-suited for no-sanding projects:
- Chalk Paint: Renowned for its excellent adhesion to almost any surface with minimal prep, chalk paint offers a matte, often rustic finish. While it adheres well, a topcoat is typically recommended for durability on high-traffic items like bunk beds.
- Mineral Paint: Similar to chalk paint in its strong adhesion, mineral paint often provides a more durable finish that may not require a topcoat, depending on the brand and usage.
- Milk Paint (with bonding agent): Traditional milk paint can be used without sanding by mixing it with a bonding agent, which helps it adhere to non-porous surfaces.
- Alkyd Enamel Paints (water-based): These paints deliver a hard, factory-like finish with the convenience of water cleanup. When paired with the right bonding primer, they create a robust surface perfect for furniture that sees heavy use.
Comparing Paint Types for Your No-Sanding Bunk Bed Project
When embarking on a no-sanding bunk bed painting project, selecting the right paint is paramount. Each type offers unique characteristics in terms of adhesion, durability, finish, and the necessity of a topcoat. The table below provides a concise comparison to help you make an informed decision based on your desired outcome and the bunk bed’s intended use.
| Feature | Chalk Paint | Mineral Paint | Milk Paint (w/ Bonding Agent) | Water-Based Alkyd Enamel |
|---|---|---|---|---|
| Adhesion | Excellent (minimal prep) | Excellent (minimal prep) | Excellent (with bonding agent) | Excellent (with bonding primer) |
| Durability | Good (needs topcoat) | Very Good (often built-in topcoat) | Good (needs topcoat) | Excellent (hard, factory-like) |
| Finish | Matte, often textured | Smooth, low-sheen | Flat, sometimes chippy look | Smooth, satin/semi-gloss |
| Topcoat Needed | Usually | Often not needed (brand dependent) | Usually | Sometimes (for extreme durability) |
| Ease of Use | Very easy | Easy | Moderate (mixing required) | Easy (with good primer) |
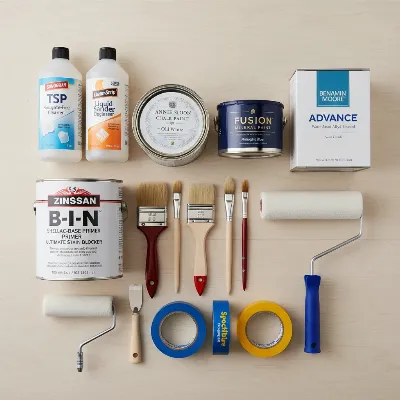 Essential materials for painting a wooden bunk bed without sanding, including cleaners, primers, and various paint types.
How to Paint an Old Wood Bunk Bed Without Sanding: A Step-by-Step Guide
Transforming your bunk bed without the dust and fuss of sanding is entirely achievable with the right approach. Follow these steps for a successful and durable finish.
1. Assess the Bunk Bed and Gather Supplies
|
Our Picks for the Best Bunk Bed in 2026
As an Amazon Associate I earn from qualifying purchases.
|
||
| Num | Product | Action |
|---|---|---|
| 1 | Disney Princess Loft Bed Tent - Curtain Set for Low Twin Loft Bed (Bed Sold Separately) by Delta Children |

|
| 2 | Zinus Narrow Twin Mattress (30” Wide x 75” Long), 6 Inch Foam & Spring Hybrid Mattress for Bunk Beds, Trundles, RVs & Compact Spaces, Medium Firm Feel, CertiPUR-US Certified |
|
| 3 | Spider-Man Loft Bed Tent - Curtain Set for Low Twin Loft Bed (Bed Sold Separately) by Delta Children |
|
| 4 | Delta Children Twin Loft Bed with Guardrail and Ladder + Tent (Bundle), White/Disney Princess |
|
| 5 | Twin Over Twin Metal Bunk Bed with LED Lights, USB Charging Station, 2 Drawers, Guard Rails & Ladder – No Box Spring Needed, Easy Assembly, White |
|
| 6 | Students Dorm Bunk Bed Curtain Home Privacy Bed Shading Curtain Net Bed Cloth Dustproof Blackout Bed Canopy Bedding Curtain Students Dormitory Tent Lightproof Cloth Bedding Canopy Spread Curtain |
|
| 7 | FDW | 6 Inch Twin Mattress | Medium Firm | Gel Memory Foam Mattress | White | Bed in a Box, CertiPUR-US Certified | Pressure Relief, Cooling Ventilated Foam | Washable Removable Cover |
|
| 8 | VIAGDO Low Loft Bed Twin Size with 9 Storage Drawers and LED Lights, Metal Twin Loft Bed with Stairway Shelf Storage, Low Loft Bed with Safety Guardrail and Under-Bed Hideaway for Kids, White |
|
| 9 | Breling Bunk Bed Privacy Curtains 3 Panel Play Curtain Set for Low Bunk Loft Bed with Felt Flag Double-Layer Gauze Playhouse Accessories with Tote Bags for Boy Girl Birthday Party Gift |
|
| 10 | DICTAC Twin Over Twin Bunk Bed with 8 Storage Drawers and Led Lights Metal Bunk Beds with Storage Headboard and Charging Station,L-Shaped bunk Bed for Kids/Teen with Safety Guardrail and Ladder,Black |
|
Before you begin, thoroughly inspect your bunk bed for any loose joints, significant damage, or areas that might require minor repairs. While you’re skipping sanding, deep gouges or structural weaknesses should still be addressed for safety and longevity. Remove mattresses, bedding, and any detachable hardware. Gather all your chosen materials: heavy-duty cleaner (like TSP), a deglosser (optional but recommended for glossy finishes), your preferred bonding primer, paint, and a durable topcoat. You’ll also need rags, brushes, rollers, painter’s tape, and protective gear like gloves and a mask.
2. Clean the Bunk Bed Thoroughly
This is arguably the most critical step when painting without sanding. Any dirt, grease, grime, or residue will prevent your primer and paint from adhering properly. Mix your heavy-duty cleaner (e.g., TSP) according to package instructions. Wearing durable gloves, scrub every surface of the bunk bed. Pay extra attention to areas that see a lot of handling, like ladder rungs and railings. After cleaning, wipe down the entire piece with clean water to remove any chemical residue. Allow the wood to dry completely.
3. Apply Deglosser (Optional, but Recommended for Glossy Finishes)
If your bunk bed has a particularly glossy or slick finish, applying a liquid sander or deglosser can significantly improve adhesion. Follow the product instructions carefully, typically applying it with a lint-free cloth. This step creates a micro-textured surface, chemically preparing the wood to grip the primer more effectively. Ensure good ventilation when using these products and allow ample drying time as specified by the manufacturer.
4. Apply a High-Quality Bonding Primer
Once the bunk bed is clean and dry (and deglossed, if applicable), apply an even coat of your chosen bonding primer. Oil-based or shellac-based primers are highly recommended for their superior adhesion and stain-blocking properties, especially when painting over dark stains or wood that might bleed tannins. Use a high-quality brush for detailed areas and a small foam roller for larger, flat surfaces to minimize brush strokes. Apply thin, even coats, and allow each coat to dry fully according to the manufacturer’s instructions, typically 2-4 hours. For very dark wood or stubborn stains, a second coat of primer might be beneficial.
5. Choose and Apply Your Paint
With your bunk bed properly primed, it’s time for the fun part: painting! Select a paint type suitable for no-sanding projects, such as chalk paint, mineral paint, or water-based alkyd enamel. Apply your first coat of paint in thin, even layers. Avoid overloading your brush or roller to prevent drips and uneven coverage. Allow the first coat to dry completely before applying subsequent coats. Most projects will require two to three coats for full, opaque coverage, especially when painting a lighter color over a darker base. Always follow the paint manufacturer’s recommended drying times between coats.
6. Apply a Durable Topcoat
For a bunk bed, which will likely endure significant wear and tear, a durable topcoat is highly recommended to protect your beautiful new paint job. Polycrylic or polyurethane are excellent choices for their hardness and resistance to scratches and moisture. Apply 2-3 thin coats, allowing each to dry fully. For chalk paint, a finishing wax can be used for a matte, protective finish, though polycrylic offers more robust protection against heavy use and spills. Ensure the topcoat is compatible with your chosen paint type.
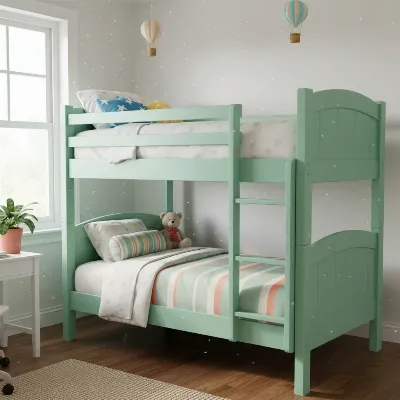 A freshly painted wooden bunk bed with a smooth, vibrant finish, achieved without sanding, placed in a child's bedroom.
Tips for a Lasting No-Sand Paint Job on Bunk Beds
Achieving a durable and professional-looking paint job on your bunk bed without sanding requires attention to detail beyond the basic steps. Here are some expert tips to ensure your efforts result in a lasting finish:
First, always work in a well-ventilated area. This is crucial, especially when using deglosser, oil-based primers, or certain paints, as fumes can be strong. Open windows, use fans, or consider working outdoors if weather permits. Second, allow adequate drying time between each coat of cleaner, deglosser, primer, paint, and topcoat. Rushing this process is a common mistake that can lead to poor adhesion, chipping, and a less durable finish. Humidity can affect drying times, so adjust accordingly.
Third, use painter’s tape for clean lines, especially if your bunk bed has multiple colors or areas you want to protect. Apply the tape firmly and remove it carefully while the paint is still slightly wet (but not tacky) to prevent peeling. Fourth, apply thin, even coats of all products. Thick coats are prone to drips, uneven drying, and can make the finish less durable. Multiple thin coats are always better than one thick coat.
Finally, for areas on the bunk bed that will experience the most wear, such as the ladder rungs or the top rail, consider applying an additional coat or two of your chosen topcoat. This extra layer of protection will significantly enhance durability against daily use, scratches, and cleaning.
Estimated Costs for No-Sanding Bunk Bed Painting
The cost of painting an old wood bunk bed without sanding can vary depending on the size of the bunk bed, the quality of materials chosen, and current market prices. However, here’s a general breakdown of estimated costs for the essential materials:
| Item | Estimated Cost (USD) |
|---|---|
| Heavy-Duty Cleaner (TSP) | $10 – $20 |
| Deglosser/Liquid Sander | $15 – $30 |
| High-Quality Bonding Primer | $25 – $50 |
| Paint (Chalk, Mineral, Alkyd Enamel) | $30 – $60 per quart/gallon |
| Durable Topcoat (Polycrylic/Polyurethane) | $20 – $40 |
| Brushes, Rollers, Painter’s Tape, Gloves | $20 – $40 |
| Total Estimated Cost | $120 – $240+ |
These costs are approximate and can fluctuate. Investing in higher-quality primers and paints often pays off in terms of durability and a professional-looking finish, making the slight increase in upfront cost worthwhile for a long-lasting transformation.
Conclusion
Giving an old wooden bunk bed a new lease on life without the laborious task of sanding is not only possible but also a rewarding DIY project. By meticulously cleaning the surface, utilizing the power of deglossers, and applying high-quality bonding primers and specialized paints, you can achieve a durable and beautiful finish that will stand up to the rigors of everyday use. This no-sand method offers a faster, cleaner, and more accessible way to refresh your furniture, proving that a stunning transformation doesn’t always require traditional prep work.
Remember, the success of your project lies in patient preparation and the careful application of the right products. With these techniques, your bunk bed can go from drab to fab, creating a revitalized space for years to come. What old wooden pieces in your home are waiting for a no-sand makeover?
Frequently Asked Questions
Can I really paint any type of wood bunk bed without sanding?
Yes, this method works for most finished wood surfaces, including previously painted, stained, or varnished wood. The key is thorough cleaning and using a strong bonding primer specifically designed for no-sanding adhesion. It’s less ideal for raw, unfinished, or severely damaged wood that requires significant repair.
How long does the paint last on a bunk bed without sanding?
With proper preparation, the use of a high-quality bonding primer, and a durable topcoat, a no-sand paint job can last for many years, comparable to traditionally sanded finishes. Durability is significantly enhanced by following all steps, especially adequate drying times and applying a protective topcoat suitable for high-traffic furniture.
Is it safe to use deglosser and oil-based primers indoors?
While effective, deglosser and oil-based primers can emit strong fumes. It is crucial to ensure excellent ventilation by opening windows and using fans. For prolonged work, consider wearing a respirator mask rated for organic vapors. If possible, complete these steps in a garage or well-ventilated outdoor area.
What kind of topcoat is best for a no-sand painted bunk bed?
For a Bunk Bed, which sees significant use and potential wear, a durable topcoat like polycrylic or polyurethane is highly recommended. These products offer excellent protection against scratches, chips, and moisture. Always ensure the topcoat is compatible with the type of paint you used (e.g., water-based polycrylic for water-based paints).