Many bunk beds are designed with versatility in mind, allowing them to be safely converted into two independent twin beds. This transformation redefines your living space and extends the lifespan of your furniture, adapting to changing preferences without needing a new purchase. Unbolting a bunk bed might seem like a significant undertaking, but with the right tools, a systematic approach, and a focus on safety, the process is straightforward and rewarding. This guide will walk you through each step, from preparing your workspace to reassembling your new twin beds, ensuring a smooth and successful conversion.
Understanding Your Bunk Bed’s Design
Before grabbing your tools, assess your bunk bed’s specific design. Not all bunk beds are created equal when it comes to convertibility. Some models are explicitly designed as “detachable” or “stacked twin” beds, meaning they come apart with relative ease, often featuring separate headboards and footboards for each bunk. Other bunk beds might be a single, integrated frame that requires more significant modifications to stand alone as two separate units. Consulting the original manufacturer’s instructions, if available, is always the best starting point, as it provides precise guidance tailored to your specific model. Pay close attention to how the top and bottom bunks are connected – whether by bolts, screws, or wooden pegs (dowels) – as this will dictate your disassembly strategy.
Tools and Materials You’ll Need
Gathering the correct tools before you begin will make the conversion process significantly smoother and safer. A well-prepared toolkit can prevent frustration and ensure that each step is completed effectively. For bunk beds buying guides on this site.
Here’s a list of commonly required items:
- Allen wrench set or hex keys: Most modern bunk beds use these for assembly and disassembly.
- Screwdrivers: Both Phillips-head and flat-head screwdrivers are often needed for various fasteners.
- Adjustable wrench or socket set: Useful for loosening or tightening bolts.
- Rubber mallet: Helpful for gently tapping components to loosen them without causing damage.
- Pliers: Can be used to remove dowels or grip smaller hardware.
- Protective gloves: To protect your hands from splinters or pinches.
- Small containers or zip-lock bags: Essential for organizing screws, bolts, and other small hardware, preventing loss.
- Labels or masking tape and a marker: For clearly identifying the contents of each bag, which simplifies reassembly.
- Measuring tape: Useful for planning new bed placements.
- A helper: Crucial for safely lifting heavy sections, especially the top bunk.
In some cases, particularly if your bunk bed was not originally designed for separation, you might need additional materials like wood screws, brackets, or even extra wood/metal for new legs or support beams to reinforce the frames.
Step-by-Step Guide to Safely Separating Bunk Beds
Converting your bunk bed into two twin beds requires a systematic approach, prioritizing safety and organization. Follow these steps carefully to ensure a smooth transition.
1. Prepare Your Workspace and Remove Bedding
|
Our Picks for the Best Bunk Bed in 2026
As an Amazon Associate I earn from qualifying purchases.
|
||
| Num | Product | Action |
|---|---|---|
| 1 | VIAGDO Low Loft Bed Twin Size with 9 Storage Drawers and LED Lights, Metal Twin Loft Bed with Stairway Shelf Storage, Low Loft Bed with Safety Guardrail and Under-Bed Hideaway for Kids, White |

|
| 2 | Breling Bunk Bed Privacy Curtains 3 Panel Play Curtain Set for Low Bunk Loft Bed with Felt Flag Double-Layer Gauze Playhouse Accessories with Tote Bags for Boy Girl Birthday Party Gift |
|
| 3 | Spider-Man Loft Bed Tent - Curtain Set for Low Twin Loft Bed (Bed Sold Separately) by Delta Children |
|
| 4 | DICTAC Twin Over Twin Bunk Bed with 8 Storage Drawers and Led Lights Metal Bunk Beds with Storage Headboard and Charging Station,L-Shaped bunk Bed for Kids/Teen with Safety Guardrail and Ladder,Black |
|
| 5 | Students Dorm Bunk Bed Curtain Home Privacy Bed Shading Curtain Net Bed Cloth Dustproof Blackout Bed Canopy Bedding Curtain Students Dormitory Tent Lightproof Cloth Bedding Canopy Spread Curtain |
|
| 6 | Twin Over Twin Metal Bunk Bed with LED Lights, USB Charging Station, 2 Drawers, Guard Rails & Ladder – No Box Spring Needed, Easy Assembly, White |
|
| 7 | Disney Princess Loft Bed Tent - Curtain Set for Low Twin Loft Bed (Bed Sold Separately) by Delta Children |
|
| 8 | FDW | 6 Inch Twin Mattress | Medium Firm | Gel Memory Foam Mattress | White | Bed in a Box, CertiPUR-US Certified | Pressure Relief, Cooling Ventilated Foam | Washable Removable Cover |
|
| 9 | Zinus Narrow Twin Mattress (30” Wide x 75” Long), 6 Inch Foam & Spring Hybrid Mattress for Bunk Beds, Trundles, RVs & Compact Spaces, Medium Firm Feel, CertiPUR-US Certified |
|
| 10 | Delta Children Twin Loft Bed with Guardrail and Ladder + Tent (Bundle), White/Disney Princess |
|
Begin by moving the bunk bed to an open area, providing ample space to work around it comfortably. This prevents tripping hazards and allows for easy access to all parts of the frame. Remove all bedding, including sheets, blankets, pillows, and mattresses from both the top and bottom bunks. Set them aside in a clean area. Clearing the bed makes the structure lighter and more manageable for the subsequent steps.
2. Detach Guardrails and Ladder
The next step is to carefully remove any safety features. Use the appropriate Allen wrench or screwdriver to unscrew and detach the guardrails from the top bunk. Once the guardrails are removed, detach the ladder. Ladders are typically secured with bolts or hooks; loosen these evenly on both sides. Place all removed hardware (screws, bolts, dowels) into labeled bags or containers, noting which part they belong to. This organization is key for a straightforward reassembly.
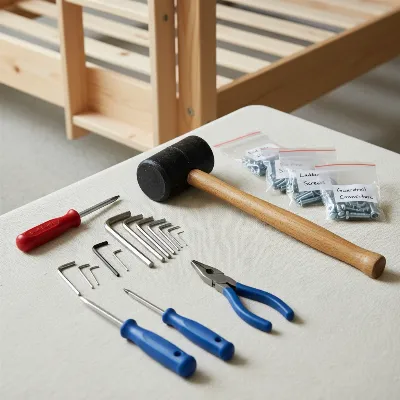 A set of wrenches, screwdrivers, and a rubber mallet laid out with protective gloves and labeled bags near a partially disassembled wooden bunk bed frame, ready for separation into twin beds.
3. Remove Mattress Slats or Bunkie Boards
With the safety components out of the way, focus on the mattress supports. Carefully lift out the wooden or metal slats from both the top and bottom bunks. If your bunk bed uses a Bunkie board, remove that as well. These supports often rest on side rails or are lightly screwed in. Stack them neatly to avoid damage and keep them separate for each bed if they differ in size or type.
4. Separate the Top Bunk from the Bottom
This is the most critical step and usually requires assistance. Locate the connecting points between the upper and lower bunks. These are typically secured by large bolts, screws, or wooden dowels. With your helper, carefully unscrew all bolts or gently tap out any dowels using a rubber mallet and pliers. Once all connections are released, slowly and steadily lift the top bunk straight up off the lower frame. Place the top bunk frame aside in a safe, clear area. Ensure both you and your helper maintain a firm grip to prevent the heavy frame from dropping or causing injury.
“Always have a second person when lifting the top bunk. It’s not just about weight, but maintaining balance and preventing damage to the frames.” – John Smith, Furniture Safety Expert
5. Disassemble the Main Frame (if necessary)
For bunk beds that are not designed for easy separation, you might find that the remaining lower frame still has tall posts or connecting pieces meant for the upper bunk. In such cases, you may need to further disassemble these components. This could involve unscrewing additional frame parts or, for non-convertible designs, carefully cutting vertical support posts to the desired height for standalone twin beds. If cutting is necessary, measure precisely and ensure the new legs will provide stable support. Always sand any cut edges for safety and apply a protective finish if applicable.
Transforming Into Two Twin Beds
Once you have successfully separated the bunk bed components, it’s time to reassemble them into two functional twin beds.
1. Set Up the Individual Bed Frames
Move each bed frame to its desired location in the room. If one of the frames (often the original top bunk) lacks proper legs or support to stand independently, you may need to utilize the extra parts from the original bunk bed assembly or purchase new ones. Some bunk beds come with ‘extender’ posts that can be removed from the bottom bunk and attached to the top bunk to create full-height headboards and footboards for both single beds. Ensure all connections are secure and tightened with your wrenches or screwdrivers.
2. Add Extra Support (If Needed)
Inspect both newly formed twin beds for stability. If either bed feels wobbly or seems too low, you might need to add additional support. This could involve attaching new, shorter legs to the frame or reinforcing side rails with extra brackets. For beds that were originally the top bunk, ensure the side rails are robust enough to function as a standalone bed. Always double-check that the bed frame can safely support the mattress and its occupant.
 Two freshly separated twin beds in a bright, organized children’s room, with simple bedding and a rug between them, showing a harmonious new layout.
3. Aesthetic Considerations
After ensuring structural integrity, you might want to consider the aesthetics. Sometimes, when a bunk bed is separated, one bed might look less “finished” than the other, perhaps missing a headboard or having exposed attachment points. You can address this by swapping parts between the two frames to create a more balanced look, or by painting the beds a new, cohesive color. Adding decorative elements like new headboards, footboards, or bedding can also help personalize each new twin bed and seamlessly integrate them into the room’s decor.
Safety Considerations Post-Separation
Safety remains paramount even after your bunk bed has been successfully separated into two twin beds. Regular checks will ensure ongoing stability and prevent accidents.
- Check All Connections: Periodically inspect all screws, bolts, and joints on both beds. Tighten any hardware that has loosened over time. A sturdy bed frame is essential for safety.
- Edge and Corner Safety: If any parts were modified or cut, ensure all edges are smooth and free of splinters or sharp points. Sand them down if necessary.
- Mattress Support: Verify that the slats or Bunkie board are securely in place and adequately support the mattress. Uneven or flimsy support can lead to discomfort or injury.
- Floor Levelness: Ensure both beds are level and stable on the floor. Use furniture glides or shims if the floor is uneven to prevent wobbling.
- Weight Limits: Be mindful of the weight limits for each individual twin bed, especially if components were reused or modified.
Tips for a Smooth Transition
Converting your bunk bed is more than just a physical change; it’s an opportunity to rethink your room’s layout and create a more personalized space.
- Plan Your Layout: Before moving the separated beds, measure your room and sketch out different floor plans. Consider how the new arrangement will impact traffic flow, storage, and natural light.
- Individualize Each Space: Take advantage of the newfound independence. Allow each person to choose their own bedding, decor, and bedside accessories to reflect their personality.
- Optimize Storage: With two separate beds, you might lose some of the integrated storage that some bunk beds offer. Look for under-bed storage solutions, wall-mounted shelves, or slim bedside tables to keep the room organized.
- Introduce Dividing Elements: If the room is still shared, consider using a room divider, a tall bookshelf, or even strategically placed furniture to create a sense of personal space for each occupant.
Conclusion
Separating a bunk bed into two twin beds is a practical and adaptable solution for evolving household needs, offering increased flexibility and personal space. By carefully following the steps outlined, from preparing your workspace and systematically disassembling the bunk bed to safely reassembling the individual frames, you can successfully improve your furniture. This process not only saves you the cost of purchasing new beds but also empowers you to create a more versatile and comfortable environment. Prioritize safety throughout the conversion and subsequent use, regularly checking the stability and integrity of the newly configured beds.
Are you ready to embrace the versatility of two independent twin beds and redesign your living space?
Frequently Asked Questions
Safely Separate Bunk Beds Into Two Twin Beds
This guide provides a systematic approach to converting a bunk bed into two independent twin beds, prioritizing safety and organization for a smooth transition.
Move the bunk bed to an open area for ample space and to prevent tripping hazards. Remove all bedding, including sheets, blankets, pillows, and mattresses from both bunks. This makes the structure lighter and more manageable.
Carefully remove safety features like guardrails and the ladder using the appropriate tools. Place all removed hardware into labeled bags or containers, noting which part they belong to, to simplify reassembly.
Focus on the mattress supports by lifting out the wooden or metal slats or Bunkie boards from both bunks. Stack them neatly to avoid damage and keep them separate if they differ in size or type.
Locate and unscrew all connecting bolts or gently tap out dowels between the upper and lower bunks with a helper. Slowly and steadily lift the top bunk straight up off the lower frame, placing it aside in a safe, clear area. Ensure a firm grip to prevent injury.
If the bunk bed was not designed for easy separation, you may need to further disassemble remaining tall posts or connecting pieces. This could involve unscrewing additional frame parts or carefully cutting vertical support posts to the desired height for standalone twin beds. Measure precisely and sand any cut edges for safety.
Get our weekly buyer guide
Practical specs, not advice. Unsubscribe anytime.
I’m so glad I found this! We bought a bunk bed for our kids’ room a few years ago, thinking it would be great for sleepovers. Now that they’re older, they really wanted their own space. The guide on unbolting the bunk bed was super clear and made the whole process much less intimidating. It really did redefine their living space, and they love having separate twin beds now.
I appreciated the focus on safety throughout the conversion process. I was a bit nervous about taking apart something so large, but the tips on ensuring a smooth and successful conversion really helped. My bunk bed wasn’t explicitly labeled as ‘detachable,’ but following the steps carefully, I was able to get it done. My kids are thrilled with their new twin beds.
This was exactly what I needed! We’re moving to a new house with smaller bedrooms, and I was worried we’d have to buy new beds. The idea of extending the lifespan of our furniture by separating the bunk beds into two twins is brilliant. The systematic approach outlined here made it feel totally manageable, and now we’re all set for the move without extra furniture costs.
The steps for converting the bunk bed were mostly helpful, especially the part about preparing the workspace. However, I found that my particular model, which I thought was a ‘stacked twin’ design, had some really stubborn bolts that were hard to get to. It took a bit longer than I expected, and I ended up needing an extra set of hands. Still, it got the job done eventually.