Assembling a bunk bed can seem like a daunting task, but with the right approach and a few clever tips, you can significantly speed up the installation process. Most standard bunk beds can be assembled in approximately 1.5 to 3 hours, depending on the complexity of the design and the number of people involved. By preparing your space, organizing your parts, and following a systematic method, you can make the process much smoother and quicker.
Pre-Assembly Preparation: Setting the Stage for Success
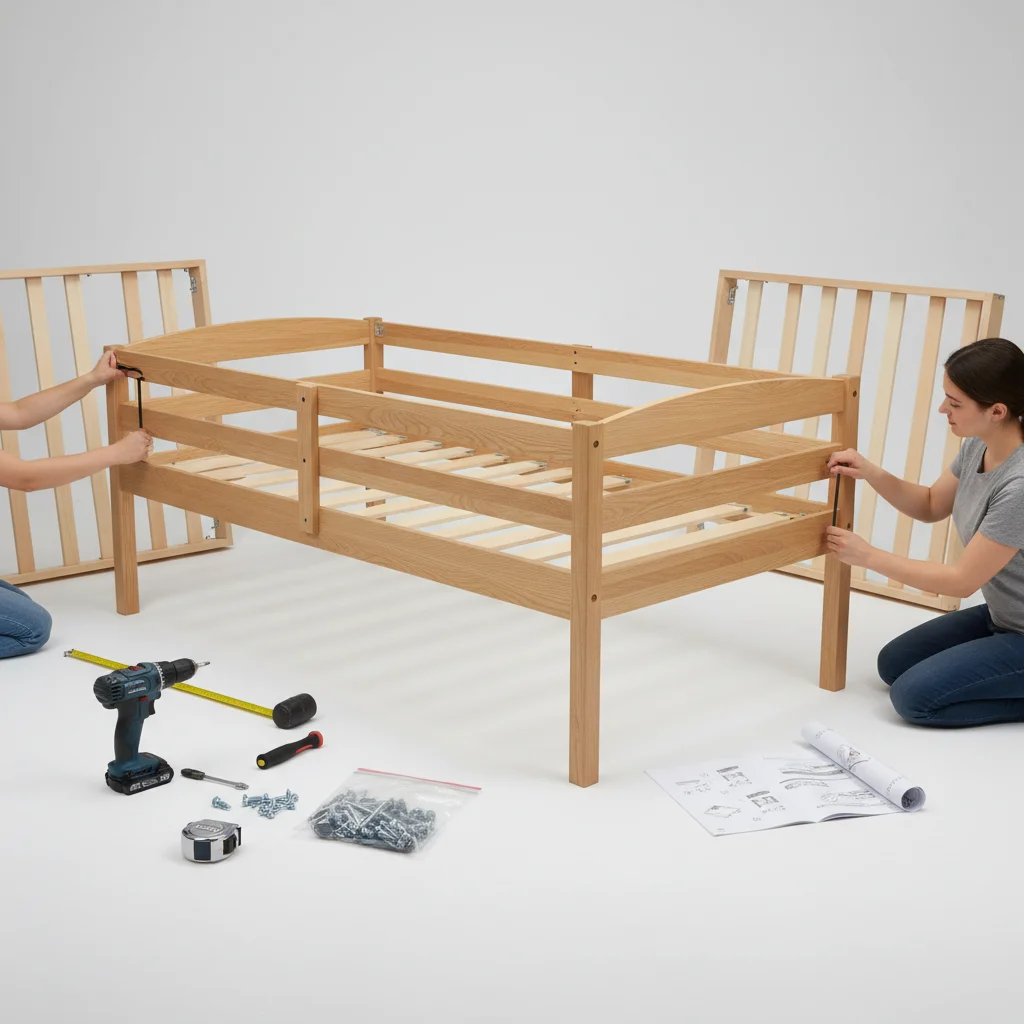
Before you even open the box, take a few minutes to prepare your assembly area. Clear out any clutter from the room where the bunk bed will be placed, ensuring you have ample space to move around the components. Lay down a blanket or cardboard to protect your flooring and the bunk bed parts from scratches. It’s also crucial to have the right tools on hand. While most bunk beds come with basic Allen wrenches, having a power drill with appropriate bits (used carefully on low torque settings) can drastically cut down assembly time for screws and bolts. Always double-check the instruction manual for specific tool recommendations.
Organizing Your Parts and Hardware
One of the biggest time-wasters in bunk bed assembly is searching for the right screw or dowel. Before you begin, unpack all components and lay them out in an organized fashion. Group similar parts together, such as all the side rails, headboards, and footboards. For hardware, empty all bags into separate, labeled containers or small bowls. This visual organization allows you to quickly identify each piece as you follow the instructions, preventing frustrating delays. Cross-reference all parts against the inventory list in your manual to ensure nothing is missing before you start.
Systematic Assembly: Following the Instructions Efficiently
|
Our Picks for the Best Bunk Bed in 2026
As an Amazon Associate I earn from qualifying purchases.
|
||
| Num | Product | Action |
|---|---|---|
| 1 | Delta Children Twin Loft Bed with Guardrail and Ladder + Tent (Bundle), White/Disney Princess |

|
| 2 | Disney Princess Loft Bed Tent - Curtain Set for Low Twin Loft Bed (Bed Sold Separately) by Delta Children |
|
| 3 | Spider-Man Loft Bed Tent - Curtain Set for Low Twin Loft Bed (Bed Sold Separately) by Delta Children |
|
| 4 | DICTAC Twin Over Twin Bunk Bed with 8 Storage Drawers and Led Lights Metal Bunk Beds with Storage Headboard and Charging Station,L-Shaped bunk Bed for Kids/Teen with Safety Guardrail and Ladder,Black |
|
| 5 | FDW | 6 Inch Twin Mattress | Medium Firm | Gel Memory Foam Mattress | White | Bed in a Box, CertiPUR-US Certified | Pressure Relief, Cooling Ventilated Foam | Washable Removable Cover |
|
| 6 | VIAGDO Low Loft Bed Twin Size with 9 Storage Drawers and LED Lights, Metal Twin Loft Bed with Stairway Shelf Storage, Low Loft Bed with Safety Guardrail and Under-Bed Hideaway for Kids, White |
|
| 7 | Students Dorm Bunk Bed Curtain Home Privacy Bed Shading Curtain Net Bed Cloth Dustproof Blackout Bed Canopy Bedding Curtain Students Dormitory Tent Lightproof Cloth Bedding Canopy Spread Curtain |
|
| 8 | Breling Bunk Bed Privacy Curtains 3 Panel Play Curtain Set for Low Bunk Loft Bed with Felt Flag Double-Layer Gauze Playhouse Accessories with Tote Bags for Boy Girl Birthday Party Gift |
|
| 9 | Zinus Narrow Twin Mattress (30” Wide x 75” Long), 6 Inch Foam & Spring Hybrid Mattress for Bunk Beds, Trundles, RVs & Compact Spaces, Medium Firm Feel, CertiPUR-US Certified |
|
| 10 | Twin Over Twin Metal Bunk Bed with LED Lights, USB Charging Station, 2 Drawers, Guard Rails & Ladder – No Box Spring Needed, Easy Assembly, White |
|
While it might be tempting to jump ahead, meticulously following the instruction manual step-by-step is the most efficient way to assemble a bunk bed. Resist the urge to tighten all bolts completely until the entire section is assembled and aligned. This allows for minor adjustments, preventing misalignments that can be difficult to correct later. If possible, enlist a second person to help. An extra set of hands can hold pieces in place, making it easier to align holes and insert hardware, especially for larger or heavier components.
Common Pitfalls and How to Avoid Them
Several common mistakes can prolong bunk bed assembly. One frequent error is overtightening screws too early, which can strip threads or make subsequent adjustments impossible. Another is misidentifying similar-looking parts; always refer to the diagrams in the manual. Pay close attention to the orientation of pieces, as installing a part backward can necessitate significant backtracking. If you encounter a particularly stubborn bolt, ensure it’s properly aligned before applying more force. Sometimes, a slight wiggle or adjustment of the connecting piece is all that’s needed.
Post-Assembly Checks and Safety Measures
Once the bunk bed is fully assembled, take a few minutes to perform a thorough safety check. Go back through all the bolts and screws and tighten them securely, but do not overtighten. Ensure all guardrails are firmly attached and stable. Test the ladder to confirm it’s secure and doesn’t wobble. Check for any sharp edges or exposed hardware that could pose a hazard. It’s also a good practice to periodically re-tighten all fasteners every few months, as they can loosen over time with use.
- Always read the instruction manual completely before starting.
- Organize all hardware into labeled containers.
- Use a power drill on a low torque setting for speed, but finish with hand tightening.
- Enlist a helper for easier alignment and lifting of large components.
- Perform a final safety check, tightening all fasteners securely.
Get our weekly buyer guide
Practical specs, not advice. Unsubscribe anytime.
The advice on clearing the assembly area was spot on. We usually just dive right in, but taking the time to make sure we had enough room made a big difference. It still took us a bit longer than the 1.5-3 hours mentioned, probably closer to 3.5, but that’s mostly because we had a more complex design with a trundle. Still, it felt much less stressful.
I was dreading putting together our new bunk bed, but the tips here about organizing all the parts beforehand really saved us. We laid everything out on a blanket like suggested, and it made finding each piece so much faster. What I thought would take all afternoon was done in under two hours, which was a huge relief. Definitely recommend following these steps!
While the systematic method was helpful, I found that some of the basic Allen wrenches included with our bunk bed weren’t the best quality. It would have been good to have a stronger recommendation for having your own tools ready, beyond just the basics. We ended up stripping one of the screws because the provided tool wasn’t great. Otherwise, the general guidance was useful.
Seriously, the pre-assembly preparation made all the difference. I used to just dump everything out, but taking the time to protect the flooring and organize the hardware was a game-changer. It really did speed up the installation process significantly, and we avoided any scratches on our new wood floors. My kids are loving their new bed!